
Watch Makersteve.com Episode 1! on Youtube showing the difference between the new support rod system and Frame Braces for Imagine That Titian, Creality CR-10, and Afinibot A31 by RebelRousingProps https://www.thingiverse.com/thing:2123233
If you like what I am doing, please click like. If you are ready to start your Black Friday/Cyber Monday start here! I get a little back for my effort.
Sign up for a free month of Amazon Prime on me or if you are Student 50% off with a six month trial!
I have been using OctoPrint for the better part of a year to manage my CR-10’s, HE3D K280’s and Ender 3’s. I did a write up on how to install OctoPrint that will walk you through installation and setup.
Had to scale up! At nine 3D Printers it is a pain to have each Raspberry Pi in an individually wrapped package. This allows me to use one power supply, and condense all the cabling into an easy to manage package.
Yup, MakerSteve.com is now running a Cluster!
Overkill? Maybe, but as an Artilleryman, that is what we do.
I got the idea from a YouTube video by KF7IJZ. He built a Raspberry Pi Cluster to “search for gravitational waves from spinning isolated compact objects (among which are pulsars) using data from the LIGO gravitational wave detector” at Einstein@home. Pretty heavy.
This project was a little painful to assemble but, the Bramble Box provides a clean package to hold four or six Raspberry Pi’s. I choose the Raspberry Pi 3 B+, but it holds Raspberry Pi 2’s and Raspberry Pi 3B’s as well.
Difficult: Moderate
Price: $40.00 (Bramble Box)-$600.00ish (Full Enchelada)
Time to complete: 1-2 hours depending on how many times to drop screws.
Purpose: Provide a dense package of Raspberry Pi’s running OctoPrint to manage multiple 3D Priners.
Quality: Pretty good!
Satisfaction: Complete!
Recommended Tools
Screw Driver
Recommended Parts/Supplies
6 each Raspberry Pi 3 B+ – 39.00
1 each Bramble Box 4 or 6 Stack, Black Ice or Wood – 34.99-39.99
1 each Anker PowerPort 6 (60W 6-Port USB Charging Hub) – 35.99
6 each 32GB Micro SD Card – 6.99 to 20.00 based on speed.
1 each Mini USB 2.0 Cable, Black, Type A Male to 5 Pin Mini-B Male, 6 foot – 10 Pack – $18.99
1 each 1 Inch Painter’s Tape, Blue
In the boxes..
This is what we need.

This is in the Bramble Box Package

Let’s get to work!
Use a razor blade to start a corner so you can peel all of the parts clean.
NOTE: The black pieces in my kit only had protective paper on one side.

You will be doing this alot!
I mean a lot!

And… just a bit more.

All the goodies laid out.
Hey, it’s a local company!
Instructions?
BLUF: There is an inside and an outside. The inside is the solid color. The instructions are a little light. I am sure the engineers and technical writers got a laugh out of it. This thing is like a Jenga puzzle to put together. It has a tendancy to undo the side opposite of the side you are trying to assemble. Look closely at my later pictures and the instructions, I assembled the sides backwards and essentially had to build it twice. For some reason the second time was infuriating.


Let’s mount the fans first, find your bag of screws and nuts.

Align the fan wall and first fan as shown below.
Push four screws through
Put nuts on the back
Tighten with a screwdriver and 1/4 inch socket.
PA-DOW! Looks good.
Other side.
I tucked the fan cables into the fan blades during assembly.
Grab your Painter’s Tape

So this experiment worked until I figured out I had the sides on backwards. A dab of tape to hold the flanged nuts in place. You can use much less tape than I used here.

Insert the top flanged nuts,
Put a little tape on the top.
Now we have to connect the top to the side. This will be fun.
Put the flanged nuts in on the side.
And put a little tape on.
Now it gets punchy.
It seems like it is best to work off the Fan back for initial assembly.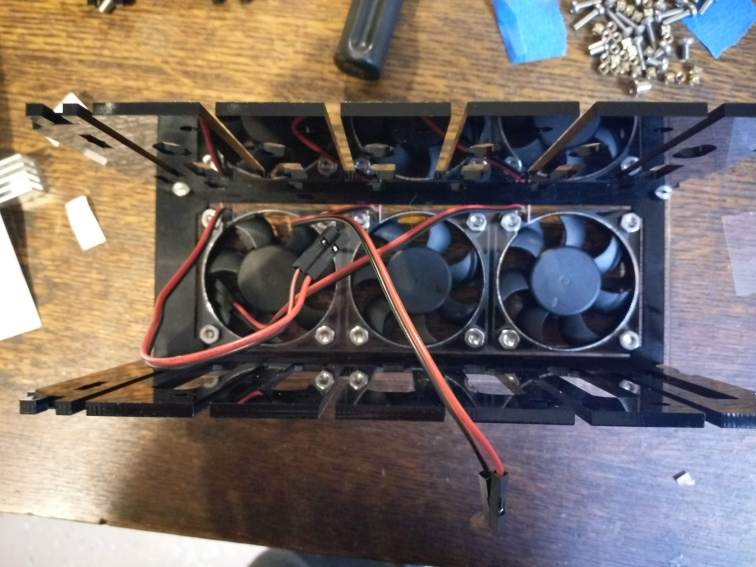
Flange nuts will sit as below.
Top installed.

Outer top installed.
Pay attention to the corners, some require flanged nuts
Careful, it’s coming along.

Inner structure complete.
Ready for the sides.

Outer cover installed.
Tape top and bottom to hold while you work. It will come undone if given the opportunity.
Assemble the Pi’s!
Grabe a clear bracket, look at the position I am holding it and insert four screws

Put the nuts on the screws
Put the Pi on…
Make sure it is square and seated
Top view.
I only put two nuts on the top, opposite corners.
Heat sinks for the top, yep, it the Bramble Box came with heatsinks!
Heatsinks installed.
And a heatsink on the bottom
Before you insert the card, review your Canakit Cheatsheet
Positive on the second pin, Ground on the third. You will wire every other card like this.
Copy your OctoPi Image to your SD Cards. OctoPi (operating system) is the image, OctoPrint is the printer management software. Install the imaged SD Cards before you install the Raspberry Pi’s
Install the Pi’s!
Careful with the wires…
Work them in one at a time.
Fully loaded!
Front is installed.
Wow!
Let’s wire it up.
New Anker 6 Port power supply.

Came with the right USB Cables.
A little cable management.
Mission complete.
Worth another look!
Be sure to check out my Ultimate Build Guide for Creality Ender 3 and Ultimate Build Guide for Creality CR-10S and CR-10
If you find this useful, please consider purchasing products through any of the links on the page, it’s free to you and I get a little something for my time. Or, just go shopping at Amazon or Ebay or Gearbest.
You can also support me through Patreon or buy me a Ko-fi!
Happy Printing,
Steve
Are you using this as “Single” or each printer is connected to each printer? I guess you are using Raspberry Pis separately.
Yes.. Each one was separate.