Be sure to enter win the Whiskey Stash Giveaway for September 2018. You could win a free 3D Printed Whiskey Stash 105mm Howitzer Shell – Replica!
Several months ago and friend and I both purchased HE3D K280s. Since that time, we both have had nothing but problems. Neither one of us knew anything about Delta style printers but we wanted the big print area and a challege. Boy did we get one.
Customer support is a mixed bag, his glass showed up broken, they told him to buy a new one. My power supply blew, they sent me a new one.
On a side note, The glass is pretty expensive to locate. I was able to find 12 inch round glass at Amazon, used my scratch method and was up and running with an extra for about 12 bucks. Alternately a 12x12inch tile mirror will work.
We both purchased Dual Extruders, recieved the extra fans that there is no way to mount unless you design your own.. https://www.thingiverse.com/thing:2822567
We also purchased the 3D Cyclops Laser.. to date I have had no success with that but more to follow.
Coming from a Creality CR10 to a HE3D K280 it is night an day. Creality is a finished solid product that is easy to set-up and use. The HE3D product has incomplete instructions and is a general pain to use.
I have devised 2 methods for calibrating using Repetier-Host and Octoprint.
Repetier-host is the manufacturer’s method.
The Octopi method is located here: https://makersteve.com/2018/08/12/calibrating-the-he3d-k200-or-k280-with-octoprint-it-can-be-done/
This needs to be done on a stable level surface. I fixed my K280 to the wall with a bracket.. it doesn’t wiggle or wobble.

First you have to level the bed, off or on it does not matter. I use a DXL360S Digital Protractor Inclinometer Dual Axis Level
Zero’s are ideal but hard to get.
You also want to ensure your belts are tight – on the K280, they seem to stretch after a while, the belt is really long.
Next you will need my Calibration worksheet to do the math for you. I have hidden the cells you don’t need to see. It works well in Windows split screen mode with Repetier-host and the spreadsheet open.

Read the spreadsheet carefully, it covers everything… if your printer comes up with negative numbers for Y and Z, you will need to set a standard positive offset.

When you open Repetier-Host you will have to connect it to your printer. Ensure your USB cable is connected and your printer is configured.

To begin calibration with Repetier-host you are going to need to navigate to the EERPOM editor… see below. Don’t make any changes yet, just take a look.

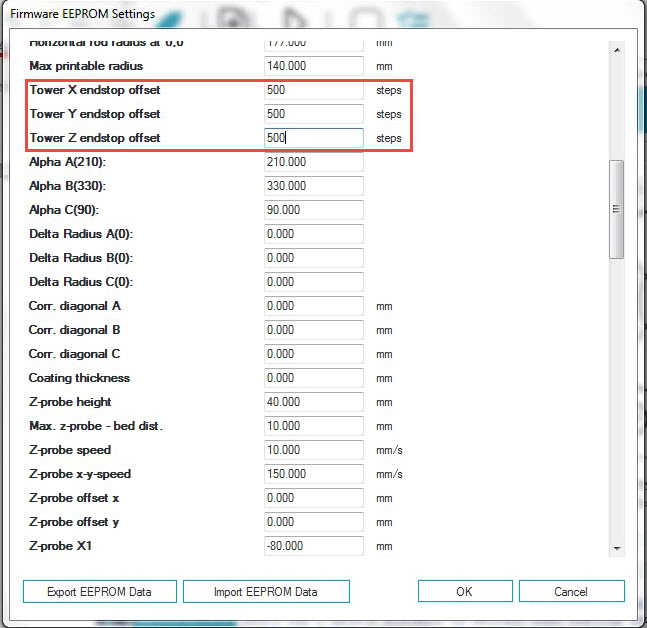
This is what the EEPROM Editor looks like.

Now you are ready to continue Calibration…
Attach the Z-probe Sensor to your hotend


Navigate to the Manual Control Window

Enter G28 and the Send Button -or- hit the Home button (looks like a house)

This will cause your printer to home and provided it is built and leveled properly, you are ready to go.
Enter “G29” and hit the send button to start the first round of calibration

Your printer will begin calibration and touch 3 points, should look something like the video below.
Or you can view on Youtube here https://youtu.be/ppGVI78X0kc
Be sure to make sure the sensor does not fall off or cables don’t get in the way.
Your terminal window will provide calibration data as show below

A closer look

Take the 3 Z-probe numbers as shown above and enter them in the spreadsheet below

Another Example

Now go to the EEPROM

You may need to scroll down a bit to find Tower Y endstop offset and Tower Z endstop offset.

Home the Printer again
Exit to the main window in Repetier-Host and click the control tab and click the Home button. Command G28 in the terminal window will have the same effect.
Calibrate the Printer again
After the printer completes the Home command, Enter G29 and do the whole process over again until your calibration results are very close.
Wash, rinse, repeat – 6 or so times.
Basically, G29, enter the result in the spreadsheet, enter the Orange into the EEPROM, save it and do it again. I have seen calibration in as few as six rounds.
In the case below I got them to calibrate exactly.

If you find your numbers aren’t getting closer or are not changing… you will have to put a positive number into all 3 tower offsets and begin the process again. This is the case with one of my printers so I enter 500 in the X, Y and Z Tower offset.. then I am good to go.
Now you will need to adjust the Z Max Length so your nozzle meets exactly where it needs to on the glass. This process is outlined below the calculation area on the spreadsheet.
Basic steps are …
STEP 1 Home / Command G28
STEP 2 Command G1 Z30 F6000 – bring down to 30MM Height in a hurry

STEP 3 Lower down to piece of paper so there is some friction and subtract height shown on the control screen on the printer from existing Z Max in EEPROM
NOTE: Should be a little less than 3MM – 2.97MM or so


STEP 4 Open your Calculator and subtract the Z Height show above (from your control screen) from Z Max Height in the EEPROM


Enter the calculated number into your Z max length and save your EEPROM.
STEP 5 You will want to home again or G28STEP 6 G1 Z0 F6000 to test with paper, should be similar friction to when you tested initally. This can take a few attempts.
Now get back to printing.
There is a ton of other useful stuff on Makersteve.com and more coming every week.
Be sure to check out my Ultimate Build Guide for Creality Ender 3
If you find this useful, please consider purchasing products through any of the links on the page, it’s free to you and I get a little something for my time. Or, just go shopping at Amazon or Ebay or Gearbest.
You can also support me through Patreon with as little as a dollar a month.
Happy Printing,
Steve
I don’t see a link to the spreadsheet you’re using
You wrote All towers should stop at the end-stops – You should not see a visible drop after endstop. I have one that keeps dropping a half inch. Any ideas why?
Sorted this out. When I try to dump the EEPROM I get a second dialog box that pops up but it white with nothing on it but the 4 buttons on the bottom.