
Fix your bad XT60 connectors.. see how here: https://makersteve.com/2019/04/16/safety-first-replace-those-bad-xt60-connectors-ender-3-fix/
I have been 3D Printing consistently for nearly two years now. I print Artillery Shells, Tank Shells, Mortar Shells, Grenades, AP Mines and other Military themes items. I have printed hundreds of Shells.. literally hundreds.
The biggest challenge with this is the stenciling the rounds. It is a pain to make the stencil and the stencils are a pain to paint.
So I will let you in on my secret sauce that has brought a whole new level to my 3D Prints with stencils.
What you need:
A Vinyl Cutter. I use a Cricut Maker which books for $360 @ Amazon. The Cricut Explore Air 2 and Silouette Cameo 3 are both good options that are less expensive ($220-250)
Cricut Mats, I use Standard Grip for Stencils. Cricut Mats hold the mylar in place while the machine cuts it.
Tools for Weeding and cleaning Mats.. Here is a Bundle that comes will some extra materials.
Mylar Sheets – choose Acetate with standard settings to cut on the Cricut Maker
And a Vinyl Samper because.. well you make stuff.
Transfer Tape if you are doing Vinyl Transfers.
Blue Painter’s Tape to finish in accordance with my instructions on finishing the Shells I design.
Software:
You Cricut Design Space.. all your work is stored in the cloud online.
You may need an editor to create PNGs to upload to Design Space, I use Inkscape. It is not easy to use initially but you can pick it up quickly.
And the Secret Sauce.. see below.
In the Beginning, there were 3D Printed Stencils. Again, I have printed probably a hundred stencils alone.
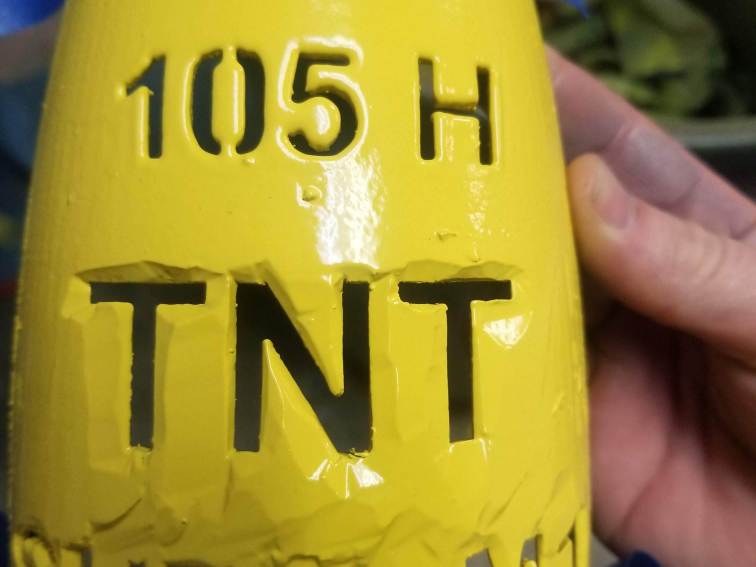
This Stencil has been used on many dozens of rounds.. look close you can see the paint build up. I have shaved and trimmed solid paint off several times. There was a time I would have cried if it broke.

The Challenge with 3D printing Stencils, especially on curved surfaces, is the supports.
This Stencil has not been cleaned.. and chances are, when I do clean it, I will break the tip of an M or and N. O’s, Zero’s, 4’s, P’s, etc are ready to let go of the innards and stick to the supports.

See the inside supports.
I have printed many, many, many stencils..

The M below was welded back together with the ‘ole Soldering Station.


And for all the stencils I have printed, very few have survived and they all take hours to print.
3D Printed stencils cause some over spray because they aren’t flat.

So a good percentage of Shells need to be reworked.. NO GOOD!

Enter my Vinyl Cutter, the Cricut Maker
This thing is a beast! I can design my stencils in a few minutes in Cricut Design Space and have them printed in a few minutes.

The Cricut Maker is the big brother to the Cricut Explore Air 2. Either one will cut stencils, vinyl or card stock, but the Maker ups your game to thicker materials like thin woods. The Cricut Explore can cut these materials but it may take multiple passes.


Now I am rocking with Kung Fu Grip!
Multiple crisp, clear Stencils in minutes…


And so many more..
Now you need the secret sauce…
When you apply the stencil.. apply a coat of clear or the same paint you are using to stop the paint from bleeding. This will work on more than just 3D Prints it works on metal, wood, and other plastics.

Apply a nice coat to fill in the lines between the print and the stencil.
Then apply your top coat.
And be amazed… the result are significantly clearer with less overspray and many fewer redo’s.


There you have it..
Say thanks!
https://www.patreon.com/makersteve
Or go shopping using these links and I will receive a small commission.
- Amazon https://amzn.to/2Dx12zG
- Ebay.com https://ebay.to/2PkVCOJ
- Homedepot.com https://homedepot.sjv.io/7nXAQ
Follow me on Social Media:
- https://twitter.com/realmakersteve
- https://facebook.com/makerstevedotcom
- Instagram https://bit.ly/2zVl4j2
- https://www.tumblr.com/blog/makersteve
More: https://makersteve.com/ https://thingiverse/sbeecroft
Follow along, more is on the way!
Thanks Steve
10 thoughts on “Up your 3D Printing Game with Custom Stencils and a Vinyl Cutter! Go Cricut Go!”