
8/13/2019 – USED ENDER Printers back in stock! I’ve bought 3.. they help you fix ’em!
Ender 3 Pro $185.00 OBO!
Ender 3 $155.00 OBO!
Ender 5 $249.00 OBO!
CR-10 259.00 OBO!
Watch Makersteve.com Episode 1! on Youtube showing the difference between the new support rod system and Frame Braces for Imagine That Titian, Creality CR-10, and Afinibot A31 by RebelRousingProps https://www.thingiverse.com/thing:2123233
If you like what I am doing, please click like. If you are ready to start your Black Friday/Cyber Monday start here! I get a little back for my effort.
Sign up for a free month of Amazon Prime on me or if you are Student 50% off with a six month trial!
Okay, so we got a screaming deal on a “used” CR-10S from the 3d Printing Store on eBay. They are one of my eBay favorites at this time. I scan it for used/returned machines and get them at a significant discount. I have bought three “used” Creality Ender 3’s and two had never been out of the box. On occasion they have buy two get discount going.
I did a new Ultimate Guide on Assembling the CR-10S or CR10 with some MakerSteve brand fixin’s for right out of the box. The CR-10 is a printer that is reliable and comes with a lot of value. Well worth a look even if you have already built your printer.
The Creality CR-10S

This is a great printer, I can’t say it enough. If in doubt, buy it.
A new CR-10S from eBay $432.00 with free shipping from the U.S. You get them within a week. Be careful trying to get a cheaper deal, some of the sellers on eBay are deceptive.
A CR-10S on Amazon, with 2-day shipping through your Amazon Prime membership, $519.00. Get a free 30-days of Amazon Prime on me if you aren’t already a customer.
I did the 3D Printed Frame Braces for Imagine That Titian, Creality CR-10, and Afinibot A31 by RebelRousingProps set off Thingiverse on my original CR-10 over a year ago. They have held up. The parts list is listed below if you want to go that route to show the cost I paid, because I overbuy! (Yep, overbuying is a thing!)
- 18-8 Stainless Steel Fully Threaded Rod, 5/16″-18 Thread Size, 24″ Length, Right Hand Threads $13ish x 2 – $26
- M5 T-slot Nuts $13ish (50 Pack, you need 50! (not really))
- Assortment of Metric Washers $10
- M5 Button Head Screw Assortment $15.
- 5/16″ Nuts $10
Total cost: $74.00 plus 3D printing time. I ended up with a lot of extra parts for later. You can get the cost down with a local hardware store.
Here’s how it looks.

Braces and nut covers are 3D printed.


Supporting Rod Set For Creality 3D CR-10 CR-10S 3D Printer DIY Upgrade Supply
I found Creality 3D created a supporting rod set for the CR-10S or CR10 that is made by the manufacturer, Creality 3D so I had to give it a try. This is only for the Creality CR-10/S that is 300mmx 300mm x 400mm. For $37, there are no complaints. Installation is simple, the look is clean and complete. It should be an option when you buy a CR-10 or CR-10S.

They do not have a version for the larger CR-10 S4 (400mm x 400mm x 400mm) or the CR-10 S5 (500mm x 500mm x 500mm). Both are massive printers and very low cost when compared to build volume!
Difficult: Easy
Price: $37ish
Time to complete: 1 hour if you are going slow.
Purpose: Firm up the frame and stabilize your printer for better prints.
Quality: Pretty good! Even includes a tap set for you Aluminum Extrusion.
Satisfaction: Complete!
Recommended Tools
Recommended Parts/Supplies
Loctite Blue Stick, Medium Strength Thread Locker
In the box..
A complete kit. Rods, Aluminum Braces, “Pull rob kit assembly diagram,” Allen wrench, 5mm Tap set,


Good quality aluminum braces.
Let’s go!
Get your Loctite Blue Stick, Medium Strength Thread Locker ready.

We will assemble the support rods first.. lube up the short threaded rod.
Look for the flat end of the supporting rod, not the beveled end. Start the threaded rod.

Start the other end.
Use your finger to stop the threaded rod from turning when you don’t want it to. Tighten, then do the second supporting rod and set them aside.
Grab your M6x35mm Live bolts? Or the screws with the loops for heads and lube them up.

You’ll need one of the nuts.
Set up all four the same way.
Insert all four in each end of the supporting rods. 
Grab the Aluminum Brace and the M5x12mm screws and thread one left and one on the right.
Now grab the M5x12mm screws, lube and the T-lock nuts.
Note the position of the T-lock nuts. If they are backwards, they will not lock in.

Now let’s tap some holes! Note the cover on the end.

Remove it..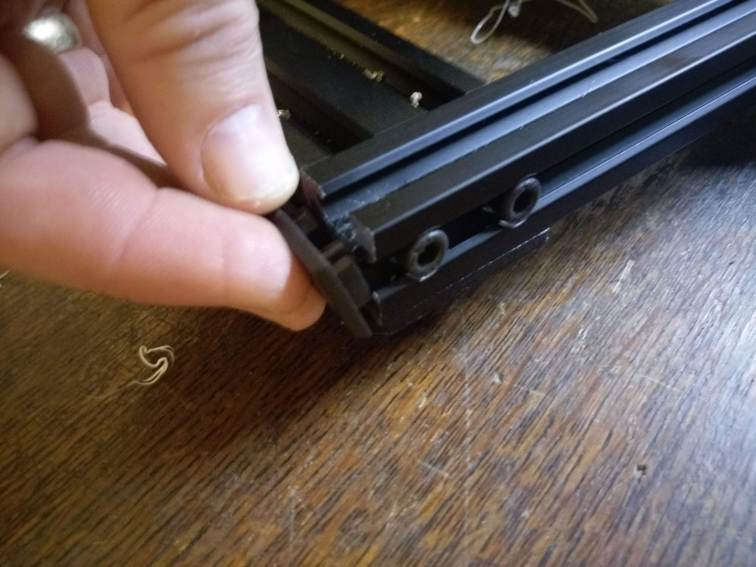
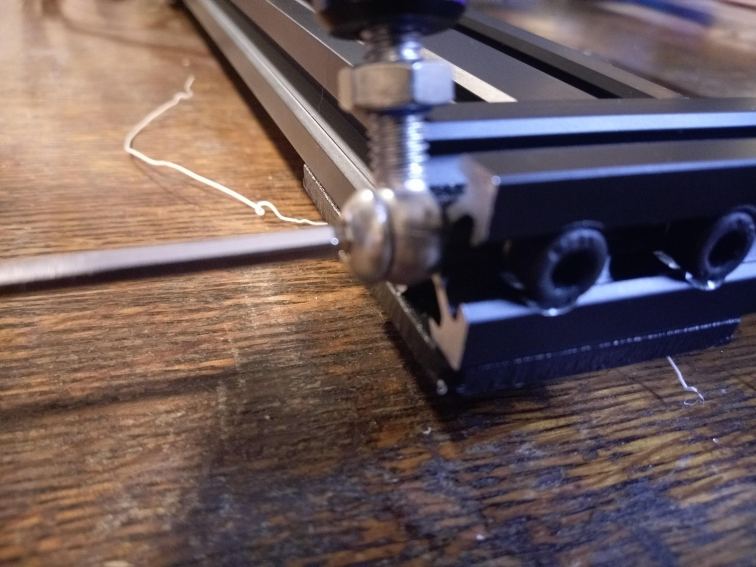
And use the tap to create the thread.
Go easy, you will have to hold up the end of the printer or hang it off the edge of your desk. This will take two attempts to get to the depth you need. Tap, pull, tap. Don’t force it.
Now this end is threaded.

Start the screw and test.
Should go in pretty well.
Add threadlocker

Attach the L pull rod connector to the frame, left and right.
Ensure they are flush on the top… and snug the screws up ensuring they lock. 
And on the end.

Another view
Tighten the lower screws.
Snug up the screws.
Put a level on the base…
Ok..
Hold a level on the upright and get it close. I work for the government so this’ll do! Repeat for the other side. This ensures you have a 90 degree angle.
Tighten it all up. All the T-lock screws and the support rod screws.
BAM! Looks good!

Feed those printers!
That’s it.. I will go over Aluminum Extruder Installation shortly.
There is a ton of other useful stuff on Makersteve.com and more coming every week.
Be sure to check out my Ultimate Build Guide for Creality Ender 3 and Ultimate Build Guide for Creality CR-10S and CR-10
If you find this useful, please consider purchasing products through any of the links on the page, it’s free to you and I get a little something for my time. Or, just go shopping at Amazon or Ebay or Gearbest.
You can also support me through Patreon or buy me a Ko-fi!
Happy Printing,
Steve
One thought on “Brace yourself! CR-10S / CR-10 Support Rod Installation.”